Printing - Setup
How do I know if the Trent Hall ePrint driver is installed?
From an open document on your computer press [File] [Print] and look at the complete list of available printers. Do you see a listing for [ePrint-MR-Trent-BW] and/or [ePrint-MR-Trent-Color]?
If so, the Trent Hall ePrint driver is installed on your computer.
Note: The needed driver is specifically for Trent Hall devices. If you have the OIT ePrint driver, you will still need to get the Trent Hall driver to operate the devices in Trent Hall.
What if I do not have ePrint?
The following files are available for installing the Trent-specific ePrint software (NetID restricted):
- (Windows) ePrint software for "TrentMidRange" printers
- (Mac) ePrint software for "TrentMidRange" printers
If you have difficulty in installing ePrint, please let us know by submitting a ticket via http://trinity.duke.edu/technology/request-help
I have Eprint. What do I need to do now?
Set ePrint as your default printer
How? (Windows)
Right-click on the [ePrint-MR-Trent] icon and select [Set As Default Printer] and then select [ePrint-MR-Trent-BW] device as your default printer.

How? (Mac)
STEP ONE
From the Apple Menu select [System Preferences] and Click on [Printers and Scanners Icon]. Right-click on the [ePrint-MR-Trent-BW] icon and select [Set Default Printer].

STEP TWO
Mac users will also have to install the manufacturers’ device driver.
The Sharp drivers for the MX-3110N printer can be found at https://global.sharp/restricted/products/copier/downloads/select_os_us.html?pid=59®ion=1&lang=2
From this page, select the appropriate OS version for your Mac. In the example below, I have selected MacOS Monterey 12.

Once you click on the OS version, a new page will show the "Mac PS Driver" link (see below).

Clicking on the "Mac PS Driver" link will expand the page to show driver details and a "Download" link at the bottom of the page (see below).
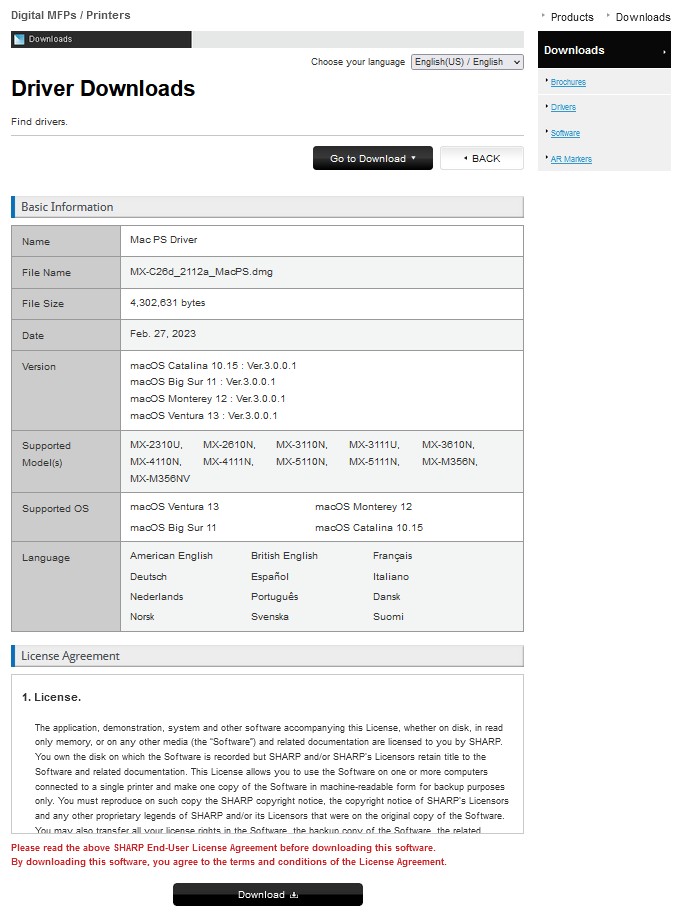
Click on "Download" to download the drivers. Install these drivers and then configure the printers. The instructions are found at the link Configuration Instructions.
How Do I Use Eprint?
Sending a print job to your ePrint account
When you are ready to print, select the print icon from the application you are using or select [File] [Print]. Notice in the image below, 2 separate printers appear for ePrint-MR-Trent; one for BW (black and white) and another for Color. Choosing this option is how you chose to print your document in color.

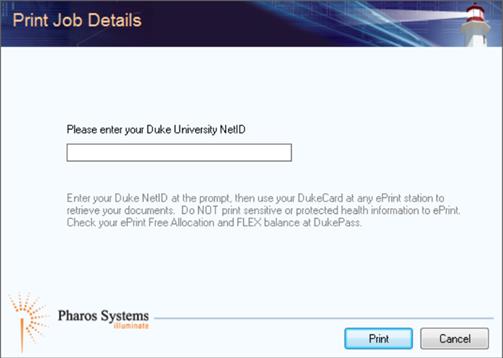
Once you have pressed the [Print] button a screen like the one below will appear for you to enter your NetID and press the [Print] button.
How do I get my document(s), as well as the copy, scan, and fax functions
Note: The following pages are also posted on the wall at the printer/copier/fax device.
- You send your job to [ePrint-MR-Trent-BW] or [ePrint-MR-Trent-Color] from your computer.
- When you approach the printer, you will see a screen like the one pictured below.
- Touch the [Touch Here] button to start.

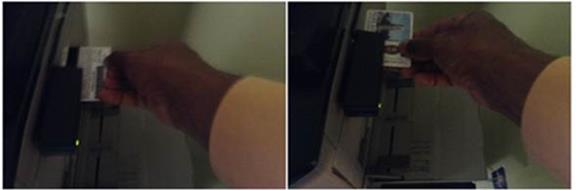
The screen below will appear. When you swipe your DukeCard on the right-hand side of the device, the screen below will quickly auto fill and go away.
If you do not have DukeCard to swipe, you may use this screen to enter your NetID and then press the [OK] button (upper right).

Note: You can swipe your DukeCard with the magnetic strip in the face-up or face-down direction.
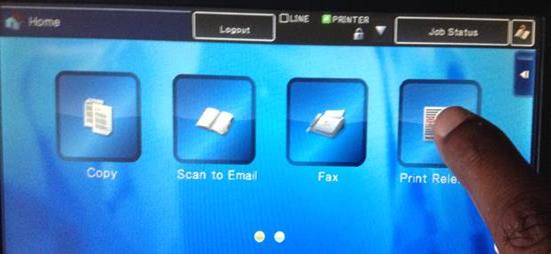
To release print jobs, touch the [Print Release] button. Use other selections for copying/scanning/faxing as appropriate. Press the arrow pointing to the right to turn the screen page and reveal the {Scan to USB] button.
If releasing prints, a screen will display showing you all the jobs you have sent to the ePrint queue (see below). Touch the checkbox on the screen to select the job(s) you would like to release next to the name of the document(s) or select [Print All] and press the [Print] button.

Your session will logout automatically after one minute, but please press the [Logout] button at the top-middle of the screen (see below) to logout so others may use the device.

Contactless ePrint
Web Printing with MyPrintCenter for DGHI/CHP is available for Trent Hall and can be safely used.
Here’s how…
- Login to MyPrintCenter (https://ep-ps-mp3-pap1.win.duke.edu/MyPrintCenter) using your Duke NetID and password.
- Select Upload button to select item(s) you want to print. (MyPrintCenter accepts files up 50MB).
**Note: The following are supported formats: Microsoft Word, Excel, Powerpoint, PDF, Images, text (CSV, RTF & TXT) and Visio). - Select the print job(s) you want to print by checking the box next to the job type.
- If changes to Print Options (Color vs. Black & White, Sides, Pages per side or Copies) are needed, please make these changes now before selecting a destination.
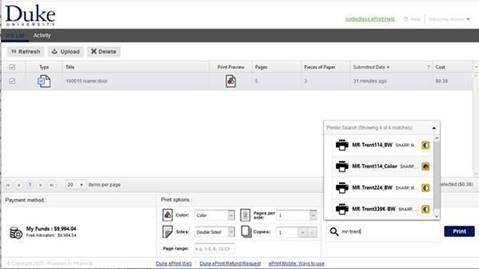
- Under Destination, select or search for a printer to send your print job to by clicking on the area next to the Print button.*
- Select Print to send the selected job(s) and a confirmation dialog box will appear.
PLEASE NOTE: Users should be at their desired ePrint location before completing Step #7, as your print job(s) will print immediately. Do NOT print sensitive or protected health information to ePrint. - Select Confirm to release your print job(s) for immediate printing.
*For the Trent Hall location , please note that:
- 3rd floor device is called MR-Trent339K
- 2nd floor device is called MR-Trent224
- 1st floor device is called MR-Trent114
You will see these devices appear, when you type “mr-trent” in the print location field on the page (see image below).